Pages

Thursday, September 20, 2012

YEASTED CRANBERRY NUT LOAF / ROTI CRANBERRY


This bread recipe from Sifu Jimmy is great, they taste wonderful toasted with a little butter for breakfast. The cranberries and nut  give the bread a wonderful flavor and the bran adds a healthy touch to the bread.

Wonderful aromas permeate the house while this bread is baking!"You can either roll it as a loaf or round it as bun..both ways are wonderful for breakfast. I used dried cranberries...to get the juicy of the cranberries, soaked it a few hours before you use.

Ingredients
250 g dried cranberries,
100 g  packed brown sugar
500 ml warm water 
15 g instant dry yeast
5 g bread improvement
80 g butter
1 teaspoon salt
600 g bread flour
350 g cake flour
50 g bran
20 g milk powder
1 no egg
200 g walnut

  • Soaked the cranberries let stand for 1 hour
  • In a large bowl, add all dried ingredients. Add water and mix thoroughly until dough become soft.
  • Add butter and continue beating.
  • Add egg
  • Finally add cranberries and nuts


  • Turn onto a lightly floured surface; knead until smooth and elastic, about 6-8 minutes. Place in a large bowl coated with cooking spray, turning once to coat top. Cover and let rise until doubled, about 1 hour.
  • Punch dough down and turn onto a floured surface; shape into a loaf. Place in a 9-in. x 5-in. loaf pan coated with cooking spray. Cover and let rise until doubled, about 30 minutes.
  • Bake at 350° for 50-60 minutes or until golden brown. 
  • Remove from pan to wire rack..brush with butter and let to cool
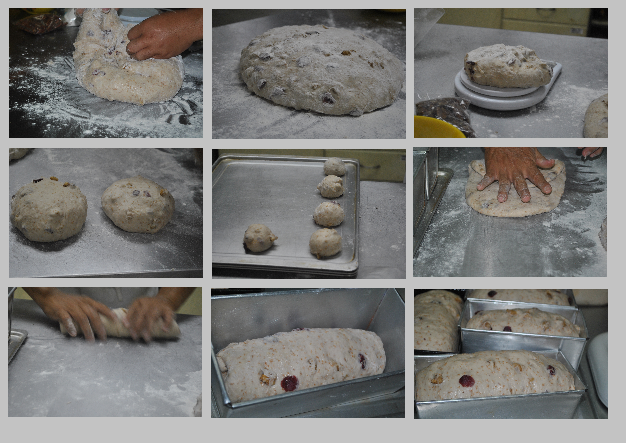


Resipi dari Sifu Jimmy...roti ini lembut dan sedap. Cranberries dan kacang menambahkan keenakkan pada roti ini manakala bran menambahkan khasiatnya. Boleh dibuat dengan dua cara...satu dengan bentuk bantal dan satu lagu dengan bentuk bun.  Cara membuatnya sama dengan membuat roti yang lain. Tidak berapa manis dan sesuai dimakan panas-panas bersama mentega.

Next Post - Pecan Crust Brownies

Wednesday, September 19, 2012

READY MIX RED VELVET CAKE


Good News for those who love Red Velvet Cake and looking for the fastest, the easiest and the tastiest one try this ready mix by maybakels.com..it's fabulous...It comes in a set the cake and the frosting. Absolutely scrumptious !!!! I'm serious..get one from your ingredient bakeries shop.


For The Cake
1000 g Red Velvet Cake Mix
 390 g  Water
 120 g  Eggs
 200 g  Oil

  • Mix all ingredients for 3 minutes / Pukul semua bahan selama 3 minit
  • Bake 150 C for 20 minutes / Bakar pada suhu 150 C selama 20 minit.


For The Filling And Frosting

250 g Cream cheese
350 g Pettina Cheese Cake Mix
500 g Whipping Cream
  • Beat Cream Cheese and Pettina Cheese Cake Mix for 4 minutes / Pukul Krim Cheese dan Campura Pettina selama 4 minit
  • Add whipping cream and beat again for another 3 minutes / Masukkan krim putar dan pukul lagi selama 3 minit
  • Apply the filling on the cake layer and topping /  Gunakan sebagai sapuan pada lapisan kek dan permukaan kek


Berita baik pada yang mencari..Red Velvet Cake..yang mudah, yang sedap dan yang pantas ingin saya perkenalkan Ready Mix Red Velvet Cake...anda pasti suka. Ia datang dengan dua pek, pek kek anpek keju frosting..cukup mudah menyediakannya dan warnaya cukup menawan...memang menarik si Baldu Merah ini. Cuba jangan tak cuba

Next Post - Almond Cranberry Loaf

Tuesday, September 18, 2012

HOW TO MAKE CALLA LILLY WITH GUM PASTE / CARA MEMBUAT CALLA LILI DENGAN GUM PASTE


Happy Tuesday All, back to our tutorial class, today I am going to share with you another simple gum paste flower that you can use to decorate your cake.Well, calla lilies are probably one of the easiest sugar flowers to make so they're a great place to start! And, they look so elegant and real when they're finished that everyone will be impressed.

Start with your favorite type of gum paste. For those seeking the easy route, your local craft store sells Wilton Ready-to-Use Gum Paste that will be fine for these flowers. So Let's start

Salam semua...hari ini masuk tutorial kedua kita....hem kita akan membuat calla lily..bunga ini adalah mudah dan begitu elegan sekali bila diletak pada kek. Ikuti saya ..saya tunjukkan step-by-step proses dan anda akan pasti berpuas hati. Hem..Selamat mencuba.


Let'see the Things You Need / Barang-Barang Yang anda perlukan


  1. Roll-N-Cut Mat / Tikar 
  2. Gum Paste - White, Yellow and Green / Gum paste warna putih, kuning dan hijau
  3. Fondant Roller With Pink Guide Ring / roller fondant bergelang pink
  4. Thin Shaping Form / Span pembentuk nipis
  5. Flower Stand / Mangkuk meletak bunga
  6. Cornflour/Ising Sugar Pouch Bag / Uncang gula ising atau tepung jagung
  7. Adhesive Glue, / gam
  8. Ball Tool / Alat pembentuk bulat
  9. Mum Cutter - Medium Sie / pemotong kuntum bunga
  10. Cone/ Kone
  11. Heart Shape Cookie Cutter / Pemotong cookies berbentuk Hari
  12. Coloring Gel. / Perwarna


  1. Use the store bought gum paste / Gunakan gum paste yang sedia ada dikedai. Jangan lupa untuk menutupkan dengan plastik jika tidak ia akan keras. Ambil sedkit dan warna kuning untuk  kuntumnya dan sedikit hijau untuk tangkainya.
  2. Roll the gum paste between 1/8 and 1/16-inch thick./ Canaikan dengan penggunakkan rol yang bergelang pink. ( roll ini datang dengan dua gelang satu pink dan satu ungu, gelang ini adalah bertujuaan untuk memastikan kenipisan gum paste anda adalah sekata
  3. Cut a petal using a heart cutter. / Terap gum paste dengan menggunakan acuan bentuk hati

  1. Place the petal on a thin piece of foam /  Letakkan kelopak bunga atas span nipis
  2. Use a ball tool to lightly thin the edges.Place the ball end 1/2 on the petal and 1/2 on the foam. Applying gentle pressure, slide down the edge of the petal. For this flower, it is better to use long strokes rather than short quick ones, which creates lots of little ruffles. Ruffle the petal from the narrow end to about 2/3 of the way to the wider end./Gunakan alat pembentuk bebola dan nipiskan tepinya, jangan terlalu lama cuma bentukkan supay bila sudah kering ia nampak lebih natural dan jangan tekan terlalu kuat ya
  3. Get the cone ready / Sediakan kon
  4. Wrap this petal around a cone. The easiest thing to do is use the cone-shaped cups. Wrap the petal around the top of the cone so that you leave a small hole at the top and one side overlaps the other. / Lilitkan di atas kon dengan lekukkan disebelah atas dan buju kelopak disebelah bawah
  5. You may need to apply a little glue or water to "glue" the edges together / Gunakan gam atau air untuk mencantumkan dua bahagian itu 
  6. Use your fingers to gently curl the edges of the petal upward. Let the petals dry overnight. / Gunakan jari anda kemaskan dekeliling kelopak....bentukkan dan naikkan sedikit supaya kelopak nampak natural. Keringkan semalaman
Calla Lily Calyses /Bahagian Bawah bunga


  1. Meanwhile make the calla lily calyses, roll small amount green gumpaste at 1.5mm. / Sementara itu buat bahagian bawah bunga. Canai gumpaste berwarna hijau setebal 1.5 mm dengan menggunakan roller pink.
  2. Use medium size cookie cutter and cut / Terap dengan acuan bulat sie sederhana
  3. Cut circle into half and brush with glue / Potong bulatan kepada dua
  4. Brush with glue or water / sapukan dengan gam atau air
  5. Using half circle position the center of the straight edge so it over hang the point of the cone on the side opposite the flower seam the rounded edge is on the flower /menggunakan separuh dari bulatan itu, dan letakan bahagaiian lekuk di atas dan gamkan
  6. Wrap around the calla lili ase and press gently to attach. Set aside to dry / Lilit bulatan ke atas bunga, tekan supaya melekat dan keringkan


Calla Lily Mum / Bahagian puntun Bunga

Now, make the center of the calla lily, which is technically called the spadix. The size of the spadix depends on the size of your calla lily petal. The general rule  use is to make my spadix about a half inch shorter than my petal. 

There are two ways of doing it. is either you do it the Wilton way or the simplest way by rolling yellow gum paste into a snake that is slightly tapered on one end. At the fatter end, insert a tooth pick or wire. Here, I actually used uncooked spaghetti noodles - but be careful! The spaghetti will hold mini calla lilies but it is not strong enough to hold larger ones. Once the spadix has dried, brush it with a very light coating of clear alcohol and roll it in corn meal or color sugar looks just like pollen, doesn't it? Let it dry a bit more.

Then, apply a little clear alcohol (or use royal icing if you want the bond to be stronger) to the base of the spadix and insert it into the petal. Remember how you left a hole at the base of the petal? The toothpick holding the spadix should fit perfectly through that hole! Let these dry overnight again.

And the Diagram below is the Wilton way.

Sebenarnya terdapat dua cara membuat kudup bunga lili ini satu cara mudah dan short cut dan satu dengan cara Wilton. Cara mudah ialah dengan mengambil sedikit gum paste berwarna kuning dan digentil membujur seperti ular. Saiz ikut bentuk bunga, biasanya buat 1/2 in rendah daripada bunga. Bila sudah siap boleh dicelup dengan cornmeal atau color sugar...untuk nampak seperti debu bunga ..tetapi saya tidak buat ini. Kudup ini di cucuk dengan spaghetti supaya senang hendak dipegang semasa mencelup dengan gula warna. Keringkan semalaman dan bila sudah siap bolehlah dimasukkan kedalam lili dengan meletakkan gam terlebih dahulu. Cara kedua ialah cara Wilton seperti dalam gambarajah di bawah.


You are done !!!! simple ha...it's fun and now you can decorate your cake. You can color your calla with your favourite color but I preferred white it is easily match any cake base so HAPPY TRYING and the video here from youtube.com helps you recap all the steps above / Da...da...udah siap...sekejap aje kan dan mudah. So sekarang anda boleh menggunakan Calla lili ini untuk menghiaskan kek anda. Untuk Calla Lilly ini anda boleh menggunakan apa-apa warna kegemaran anda, tetapi saya lebih sukakan putih kerana senang hendak dimatchkan dengan warna lain. Apa pun paling penting membuat hiasa seperti ini pastikan anda keringkanya semalaman supaya ia jadi lebih kemas dan tidak kemek. Ok setakat ini dulu untuk tutorial kedua..dan jangan lupa lihat video di bawah..anda akan mendapat gambaran yang lebih jelas lagi. SELAMAT MENCUBA dan bila berjaya jangan lupa pengeras untuk saya ya..ha..ha..


Next Post - Ready Mix Red Velvet Cake

Monday, September 17, 2012

TO DIE FOR STEAMED CHOCOLATE CAKE / KEK CHOCOLATE KUKUS CHEF ZUBAIDAH


I found this recipe in  http://noorsha.blogspot.com/2011/04/kek-coklat-lembab-kukus-chef-zubaidah.html  and it is TO DIE FOR! This is the cake that popular among the foodie blogger in Malaysia. Recipe was from Chef Zubaidah and many had tried. It's so easy to make, looks beautiful and no frosting is needed - it's already rich enough! however  I made mine with some chocolate ganache. This is hands-down the most deliciously moist, sinfully rich, to-die-for chocolate cake ever. It's honestly the best cake I've ever made.

Here's how and what you need

**1 tin susu  cair / 1 can evaporated milk
**200 gm minyak  sayuran / 200 g vegetable oil
**250 gm susu pekat / 250 g condensed milk
**100 gm serbuk koko / 100 g cocoa powder


250 gm gula kastor / 250 g castor sugar
4 biji telur -/ 4 eggs
150 gm tepung gandum / 150 g flour
1st soda bikarbonat / 1 tsp bicarbonate soda
1 st baking powder/1 tsp baking powder

  • Campurkan kesemua bhn bertanda ** dan masak dgn api perlahan sehingga licin.  Tak payah sampai menggelegakCombine / Ingredients marked (A) in a saucepan. Stir over low heat until sugar is dissolved and smooth, turn off the fire and keep warm.
  • Pukul telur hingga kembang / Beat eggs till fluffy


Satukan dgn telur yg di pukul tadi dgn mixer..dan masukkan bahan kering / Add chocolate ingredients into beat eggs and stir till well mix Addt  dry ingredients and stir well 


Masukkan ke dlm tin yg di lapik & minyakkan. Kukus selama 1 jam dgn api sederhana. Pastikan air telah menggelegak sebelum di kukus./Lined 8 inch round baking pan. Pour the batter into the lined pan and place the pan into the steamer.Cover the top of the pan loosely with a piece of aluminium foil.Steam over medium heat for 1 hour.


Sejukkan dahulu sebelum di hiaskan dgn icing @ ganache./. Cool the cake in pan before turning out for further decoration. 

For chocolate ganache / Untuk Ganache
12 oz chocolate / 12 oz chocolate
1 cup crea / 1 cawan krim


Kek coklat dikalangan blogger..ramai yang sudah mencuba..saya baru hendak mencubanya. Resipi dari Chef ubaidah yang cukup sedap..lembut, lembap dan kaya dengan cokalat. membuatnya juga mudah. Sebenarnya kek ini tidak perlu dibuat frosting kerana sudah cukup kaya dengan coklat tetapi jika anda suka boleh dibuatkan sedikit ganache,

Next Post - How To Make Calla Lily With Fondant

Sunday, September 16, 2012

HOW TO MAKE FONDANT DAISY / CARA MEMBUAT BUNGA DAHLIA DARI FONDANT


Hello my lovely readers! I wanted to start off with a big thank you to all of you who left such heartfelt comments in  my facebook on my tutorial program - Making Flowers With Fondant. I’m really glad to share what I've learned with everyone! Not and expert in this field but I believe the tutorial below will definitely helps many.

For a start I choose Daisy. It is simple and I hope it could boost up your spirit ha. - Have Fun

Terlebih dahulu saya ingin mengucapkan berbanyak terima kasih kepada ramai yang menyokong projek tutorial ini. Sesungguhnya saya mendapat sokongan ramai dan ramai begitu teruja untuk mencuba membuat bunga dengan fondant ini, dan sebagai permulaan projek saya memilih bunga daisy kerana ia mudah dibuat. Seperti yang saya katakan dahulu untuk membuat projek ini ianya memerlukan modal sedikit untuk membeli peralatan. Peralatan fondant ini boleh didapati di kedai menjual peralatan kek. Biasanya yang menjadi pilihan adalah Wilton..tetapi jika budget tidak mengiinkan bolehlah beli yang buatan Cina atau anda boleh menggunakan kreativiti anda untuk menggantikan dengan apa yang anda.

Satu lagi yang perlu diambil perhatian..biasanya dalam membuat bunga seperti ini adalah digalakan untuk mencampur 50% gum paste dan 50% fondant..ini supaya tekture kelopak akan lebih cantik. Bunga yang siap hendaklah dikeringkan semalaman sebaiknya dalam bilik air con supaya ia benar-benar kering dan cantik.

Untuk mendapatkan gambaran yang lebih jelas saya sertakan video yang saya ambil dari youtube...yang boleh membimbing anda dengan lebih tepat. - SO HAVE FUN


 OK let's start !!!. When beginning any decorating task, it helps to take account of what what you will need and have everything handy. So for Daisy you need to have the following :-


  1. Roll N Cut Map / Tikar untuk mencanai dan potong
  2. Ready to use fondant - a mixture of 50% fondant and 50% gum paste. White and Yellow Cover with plastic / fondant yang sedia diguna ( biasanya untuk bunga di campurkan 50% gum paste dan 50% fondant. Uli sehingga lincin dan warnakan mengikut keperluan. Untuk ini kita gunakan putih dan sedikit kuning / Dibalut dengan plastic
  3. Plastic Roller Fondant with Pink Guide Ring / Pencanai plastic berserta ring berwarna pink
  4. Thin shape form / Span nipis
  5. Modelling Tool /Alat Pembentukan
  6. Veining Tool / Alat lekukan
  7. Daisy Flower Cutter/ Pemotong Daisy
  8. Large Mum Cutter / Pemotong untuk puntung Daisy - Besar
  9. Small Mum Cutter / Pemotong Puntung Daisy - Kecil
  10. Flower Forming Cup / Cawan Pembentuk Bunga
  11. Filling Dusting Pouch / Punjut untuk isi gula ising atau tepung jagung
  12. gum Glue Adhensive / Gum

How You Do It / Bagaimana Anda Membuatnya


Before you start ensure that your fondant is soft and ready to be used / Pastikan Fondant anda lembut dan lincin untuk di gunakan.Using dusting pouch to lightly dust the Roll N Cut Mat / Gunakan Uncang gula/tepung kacang untuk dipupuk diatas tikar pencanai..ini dilakukan supaya fondant tidak mudah melakat.

  1. Roll out small amount of white gum paste very thin 1.5 mm / Canaikan gum paste pada kenipisan 1.5 mm.
  2. Cut two daisy shapes using Large Mum Cutter / Terapkan dengan acuan Daisy buat 2 keping.
  3. Make sure that you got a clean cut / Pastikan anda mendapat bentuk potongan yang kemas
  4. Place one daisy shape on thin form dusted with dusting pouch.Pull small end of veining tool down center of each petal beginning at the point and working toward center of daisy shape, repeat with the second Daisy / Letakkan kelopak daisy di atas span nipis dan gunakan alat pembentuk dan tekan dari atas sehingga ke tengah. Ini dilakukan untuk menjadikan kelopak daisy lebih hidup. Ulangi proses untuk kelopak seterusnya.
  5. Place daisy on Flower Forming Cup.Brush center of one shape with gum paste/Letakkan kelopak di atas acuan pembentuk dan sapukan gum.
  6. Attach the second shape on top of first so petals are positioned in between petals of the first shape / Letakkan kelopak kedua di atas kelopak pertama dan pastikan susunan kelopak berselang seli antara kelopak pertama dan kelopak kedua
  7. Use shaping tool and press at the center of daisy / Gunakan alat pembentuk dan tekan ditengah kelopak
  8. Take the yellow gum paste roll and cut with small mum cutter/ Canaikan gum paste berwarna kuning dan terap dengan pembentuk kelopak kecil
  9. Roll small pea size-sied piece of yellow gum paste into a ball and flatten / Bentukan sebesar kacang peas
  10. Using small amount of gum glue adhesive  at the center / Letakkan gum ditengah daisy
  11. Attached mum / Letakkan puntung ditengah bunga
  12. Let the daisy dry overnight and daisy ready to be used/Keringkan daisy semalaman dan daisy sedia digunakan


You Might Also Like These

Related Posts Plugin for WordPress, Blogger...