Pages

Tuesday, March 12, 2013

STACKED TIERED CAKE CONSTRUCTION


Fondant is a great way to decorate a cake, or cookies or cupcakes, for a special occasion. Fondant's smooth finish will give your dessert the illusion of coming straight from a professional bakery. It is not the easiest cake decorating material, but once you get the hang of it, it can be used in many different ways for many unique looks.


Before applying fondant to your cake you want to make sure it is completely level and flat. Use a knife to cut off any excess cake and to round the edges. If there are any sharp corners or edges the fondant might crack when it is drying. Next, use a large spoonful of frosting to secure your cake to a cake board or plate you will be serving it on to prevent it from moving around and sliding while you are trying to decorate it.

Apply butter cream frosting to the entire cake. This will hide any uneven spots or crumbs stuck to the cake while also acting as a sealant that the fondant will stick to. The fondant will also stick better if applied to the cake when it is slightly chilled so you might want to stick it in the fridge for a few minutes.
To prepare the fondant for the cake knead it in your hands until it feel like clay. Now roll it out with a rolling pin. You can sprinkle it with cornstarch if it starts to stick to your rolling pin or countertop. Keep rolling until the fondant is 1/4 inch thick and a little larger than the cake you wish to cover with it. It should be large enough o cover the entire top and sides of the cake and touch the board or plate.
Once the fondant is rolled out to the correct size flip it over and place it on the cake, this way the side that was touching the countertop is facing up. This side will be shiny. Starting in the center and working outwards smooth the fondant using your hands. Work towards the edges and move your way down the sides to remove any air bubbles trapped underneath.

Once the fondant is smooth on the cake cut any excess from the bottom that hangs past the edge of the cake. You can now continue to decorate the cake with more fondant, sprinkles, frosting, or whatever you choose.
Rolled out fondant can be cut with cookie cutters and then used to decorate over more fondant or just plain frosting. You can also sculpt fondant just like clay to make any 3D shapes or figures you might need to complete your design.


Berkesempatan menyediakan Kek Kahwin untuk anak saudara merupakan satu pengalaman yang cukup menarik. Saya hanya memperlajari untuk membuat kek fondant cara membalut kek dan menyediakan bunga tetapi untuk kek kahwin bertingkat saya belum berkesempatan untuk memperlajarinya. Cuma berpandukan dengan internet saya laksanakan tugas ini. Tekniknya lebih kurang sama dengan kek fondant yang lain tapi untuk kek bertingkat ini paling penting ialah structure kek supaya kek akan kuat dan tidak goyang.


Untuk Kek Kahwin ini oleh kerana saya masih baru saya cuma menggunakan butter cake..sebab tektur butter cake mampat. Sila lihat gambar rajah dibawah bagaimana untuk menyusun dan menguatkan kek. Ukuruan bagi setiap kek harus tepat supaya ia tidak sengit. Teknik membalut kek boleh dirujuk pada entry saya yang dahulu. Saya ada menunjukkan step by step proses. Untuk  kek kahwin ini highlightnya ialah structure kek. Kek apabila telah selesai disusun dimasukkan batang kayu nipis menembus ketiga-tiga tingkat supaya ia tidak goyang. Kayu ini boleh didapti di mana-mana kedai kek. Lepas structurnya kukuh bolehlah dihiaskan dengan design sendiri. Ternyata membuat sendiri adalah lebih puas dan menyakinkan....Insyallah.

Stacked Tiered Cake Construction - adapted from Wilton

Stacking is the most architectural method of tiered cake construction. Tiers are 
placed directly on top of one another and pillars are not used. Cakes are supported 
and stabilized by dowel rods and cake boards.
Click here to view ideas that use stacked cake construction.

step 1

Dowel rod all tiers except top tier.

step 2

Position the middle tier on the base tier, centering exactly.


**TIP: Finely shredded coconut or confectioner's sugar, placed in
 area where cake circles or plastic plates will rest, helps prevent 
                            frosting on the cake from sticking.

step 3 

Repeat with the top tier.

step 4

To stabilize tiers further, sharpen one end of a wooden dowel 
rod and push it through all tiers and cake boards to the base of 
the bottom tier.
     step 5
To decorate, start at the top and work down.


Monday, March 11, 2013

HEART SUGAR COOKIES


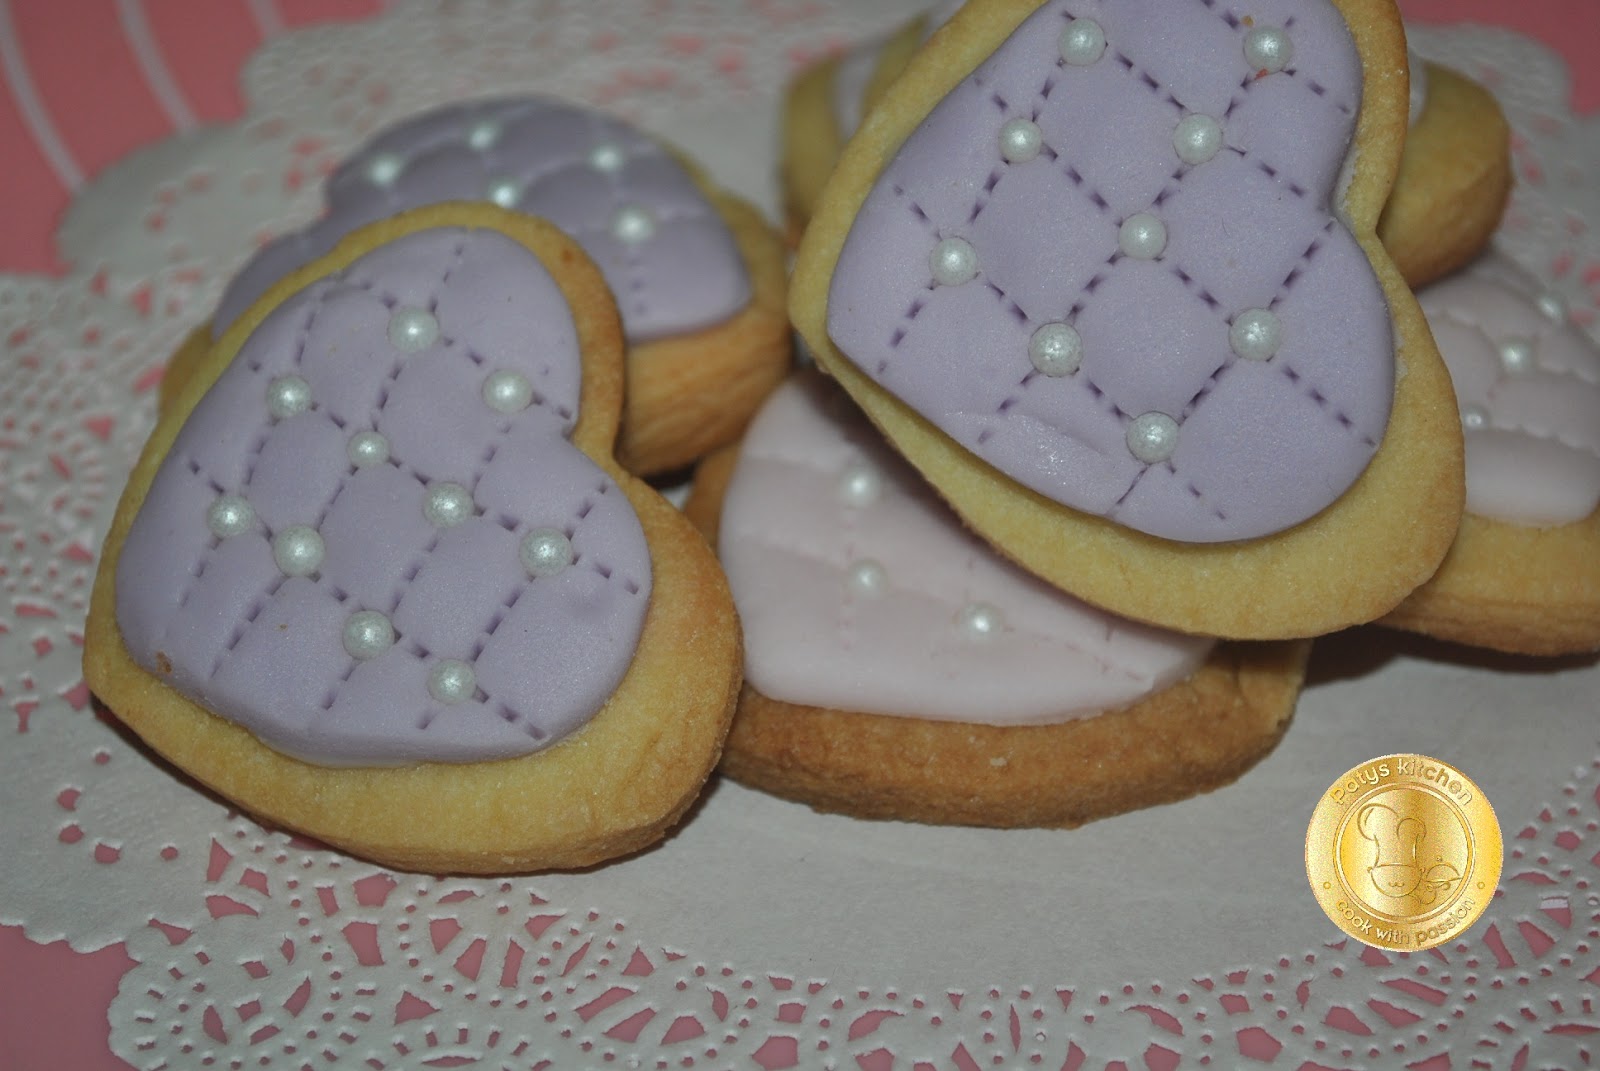
Sugar Cookies are a sweet and tender cookie with wonderfully crisp edges. They are an American favorite and although they were once made primarily during the Christmas season, they are now a year round favorite. They are delicious whether dressed simply with a sprinkling of colored sugar or frosted with royal icing. This time around instead or the normal frosting I used fondant instead...it's much..much simpler and not messy. I made this for my niece wedding. I used the sugar cookies to replace the normal eggs for " bunga telur".It's cute and presentable


Vanilla or Chocolate Sugar Cookies
Yield: Approximately two dozen             
                                                             
This recipe is a great blank canvas for whatever cookie art you're dreaming up.  To make the chocolate version, omit the almond extract, replace 1 cup of flour with 1 cup unsweetened cocoa powder and blend it with the flour in step 3.

Vanilla Sugar Cookies
1 cup butter / 225 mentega
1 cup plus 2 tablespoons granulated sugar
1 egg
1 tsp. vanilla extract

1/2 tsp. almond extract
3 cups all-purpose flour
Pinch of salt
  1. In a stand mixer fitted with the paddle attachment, mix the butter and sugar together until just incorporated. Do not over-mix at this stage, or the cookies may spread while baking.
  2. Add the egg and vanilla and almond extracts. Mix again on low speed, stopping to scrape down the sides of the bowl intermittently as needed.
  3. In a medium bowl, whisk together the flour and salt.  Add to the butter and egg mixture.  Mix on low speed until a dough is formed and there are no longer any streaks of butter in the mixing bowl. The dough will often clump around the paddle attachment while being mixed. This is normal and a good sign that your dough is the right consistency.  If your mixture does not come together and is crumbly, add ice cold water 1 tbsp. at a time until the dough clumps.
  4. Line a baking sheet with parchment paper.
  5. Turn the dough out onto a sheet of wax paper and top with a second sheet.  Roll dough into an oblong disc between the paper with a rolling pin.  Transfer dough - wax paper and all - to a large cookie sheet.  Wrap the dough tightly onto the cookie sheet with plastic wrap and refrigerate for 1 hour.
  6. Remove top sheet of wax paper and roll dough a little thinner.  It should not be sticky.  You may dust the surface lightly with flour if it is sticky, but not too much!  You don’t want streaks of white flour baked onto your pretty sugar cookies.
  7. Roll dough to a ¼-inch to ½ -inch thickness.
  8. Cut out desired shapes from the dough and transfer to the prepared baking sheet. Be careful not to stretch the cutout shapes or they will be distorted after baking.
  9. Refrigerate the cutouts for 30 minutes. This will help the cookies maintain a crisp shape during baking.
  10. Preheat the oven to 350°F.
  11. Bake the cookies for 15 to 20 minutes.
  12. Let cool on the baking sheet for 5 minutes. Transfer to a wire rack. Decorate the cookies when completely cooled.

Jeweled Heart Sugar Cookies
Yield: About fifteen 4-inch cookies


I used a large 4 1/2-inch heart-shaped cutter to cut the smooth-edged heart-shaped cookies. A slightly smaller scalloped heart-shaped cutter was used to cut the fondant. If you don't have a smaller sized heart cookie cutter to cut the fondant, you can use the same one that you used to cut the cookie dough.

1 recipe Vanilla Sugar Cookies, baked into 4 1/2-inch heart shapes
1 recipe Chocolate Sugar Cookies, baked into 4 1/2-inch heart shapes
3/4 lb Satin Ice ready made fondant, white vanilla
Pink gel food coloring
Pearl dragees
2mm silver metallic dragees
4-inch scalloped heart-shaped cutter
Fondant quilting tool or toothpick


Inginkan satu kelainan cuba sugar cookies ni. Sugar cookies ini memang terkenal di America terutama semasa perayaan Christmas. Biasanya dihiaskan menggunakan royal icing tapi saya membuat kelainan dengan menggunakan fondant. Kebetulan fondant banyak selepas saya gunakkan untuk membuat kek perkhawinan anak saudara saya. Mudah dan menarik...saya pack cookies ni dalam plastic dan gantungkan bersama telur paha menjadikan "bunga telur. Satu cara jika anda malas untuk merebus telur.

Next Post - Wedding Cake - 

PURPLE OMBRE CAKE IN THE JAR


A cake in a jar is perfect to give as a gift. There are two ways of doing it....it's either you bake the cake  in the jar or bake  cake separately, cut and insert in the jar. I did  the second version. It's  safer that way, This bright purple and festive layered cake in a jar is easy to make and even easier to eat. Plus, once you're done eating out of the jar, you can  reuse the jar.!!!


Purple Ombre layered cake in a jar

Ingredients:
  • 1 packet sponge mix/ 1 paket kek span mix
  • 8 eggs / 8 biji telur
  • 175 ml canola oil / 175 ml minyak jagung
  • 175 ml water  / 175 ml air
  • Yam paste, Vanilla and Purple food coloring / perisa keladi, vanilla dan perwarna ungu
  • 1 can white vanilla frosting (or homemade buttercream)/ 1 sedikit butter cream
  • Purple sprinkles / Taburan gula berwarna ungu

Directions: 

  1. Preheat oven to 160 C and grease two circular cake pans with nonstick cooking spray./ Panaskan ketuhar pada 160 C api atas bawah
  2. In a medium bowl, mix the cake mix, eggs, canola oil and water. Divide the cake into 3 portion, one with yam, paste and her 2 with vanilla.Add a few drops of food coloring to the each portion mix until you get a 3 tone color. Pour the cake mix into the prepared pans and bake for about 25-32 minutes or until a toothpick inserted in the middle comes out clean./ Masukkan semua bahan dan pukul sehingga gebu dan kental. Bahagi adunan kepada 3 dan masukkan perisa keladi pada 1 adunan dan perisa vanilla kepada adunan selebihnya. Warnakan adunan kek mengikut tone warna ungu terang sederhana dan cerah. Tuang dalam acuan dan bakar selama 20 minit atau sehingga kek masak apabila dicucuk.
  3. Let the cakes cool in the pan slightly, then remove and let cool completely on a wire cooling rack. Once cooled, use the cutter to cut out circular shapes that will fit inside. Then, layer the cake with the frosting inside the jar, careful not to smudge the frosting./ Biarkan kek sejuk dan keluarkan pada dawai penyejuk. Bila telah sejuk potong kek menggunakan pemotong bulat dan masukkan kek kedalam botol dan  sapukan buttercream...ulangi proses sehingga ke lapisan terakhir dan taburkan gula warna ke atas kek.
  4. Finish the top of the jar with frosting and add fun sprinkles. Serve immediately.

Get the bottol Ready / Siapkan botol

Cool cake / sejukkan kek

Cut cake to fit the jar / Potong kek mengikut size botol

Pieces of cut cake / kepingan kek yang dipotong
Insert cake in the jar and layered with butter cream / Masukkan kek dalam jar dan lapiskan deng butter krim

AFinish the top of the jar with frosting and add fun sprinkles. / Taburkan gula di atas


Kek In The Jar ini sekarang semakin popular. Sesuai dijadikan sebagai "door gift" biasanya di majlis perkahwinan atau pun apa-apa majlis. Terdapat dua cara penyediaanya ...satu samada dibakar kek terus di dalam jar atau samada kek dibuat secara berasingan dan dipotong mengguna cookie cutter dan dimaskkan ke dalam jar. Saya menggunakan cara yang kedua yang mana saya rasakan lebih selamat. Untuk resipi ini saya menggunakan kek span dan mewarnakan kek mengikut tone warna ungu terang, sederhana dan cerah. Kek dilapiskan dengan buttercream dan ditaburkan gula berwarna ungu. Resipi ini memang sesuai kerana keknya lembut dan sedap. Resipi yang sama juga boleh digunakan untuk warna dan perisa yang bersesuaian dengan majlis atau kehendak anda.

Next Post - Fancy Cookies - My Heart

THE MAKING OF GERMAN BLACK FOREST CAKE


A very simple cake to prepare. All you need are chocolate sponge cake, black pitted cherry (in a can) and prepare some chocolate mousse. Layered the cake and make some topping with the same mousse you used for the fillings. This is also another continental cakes hits. Soft, chocolatay and rich with the fillings.


The Cake
1 packet sponge cake mix / 1 paket tepung span kek
175 ml water / 175 ml air
175 ml corn oil / 175 ml minyak jagung
8 eggs / 8 biji telur

  1. Heat up oven at 160 C and line 2, 9" tin.  / Panaskan ketuhar pada 160 C dan oles acuan 2 2 acuan pembakar 9".
  2. Whisk eggs with sponge mix till light and flluffy. Add in water and whisk again. Finally add in corn oil oil.  Combine well and pour mixture into the 2 line tin and bake each for 30 minutes or till done.. / Pukul telur dengan tepung kek span sehingga gebu, Masukkan air dan pukul lagi. Akhir sekali masukkan minyak dan gaul rata. Tuang adunan dalam acuan dan bakar selama 30 minit setiap satuna.

The Chocolate Mousse

350 g whipped cream / 350 g krim putar
1 1/2 tbsp caster sugar / 1 1/2 sdb gula kaster
20 g cocoa powder / 20 g serbuk koko
75 ml pitted cherry juice / 75 ml jus ceri hitam
 1 1/2 tsp gelatine (dissolved in 2 tbsp water / 1 1/2 sdt gelatine dilarut bersama 2 sdb air)
1/4 tbsp instant coffee powder / 1/2 sdb serbuk instant coffee saya guna nescafe
1- 2 can dark pitted cherry / 1-2 tin ceri hitam

Dissolve gelatine and instant coffee till dissolve (double boiled) it and set aside / Compurkan nescafe dan gelatine dan larutkan sehingga benar2 larut (saya guna double boiler method) Sejukkan dan letak sebelah.
In a mixing bowl place cream, cocoa powder and sugar and whisk at medium speed untill stiff. Gradually add in juice and gelatine / dalam mangkuk lain satukan krim, gula dan serbuk koko. Pukul dengan kelajuan medium sehingga jadi soft peak. Perlahan-lahan masukkan gelatine dan jus ceri.

To Assemble The Cake
Place a layer of cake on the cake board. Spread with mousse and spread with cherries. Top with second layer of cake and continue process until complete. spread the whole cake with mousse and decorate with grated chocolate / Letakan sekeping kek di atas board dan sapukan mousse di atas kek.susun ceri hitam dan sapukan lagi mousse..dan letakkan lapisan kedua. Teruskan proses melapis sehingga hapis dan akhir sekali sapukan ke mousse di atas dan keliling kek dan hias dengan parutan chocolate


Kek ini paling mudah menyediakanya. Anda hanya perlukan kek span, buah ceri hitam dalam tin dan menyediakan chocolate mousse. Kek dibelah empat dan diselang selikan dengan cokolat mousse dan ceri hitam. Akhir sekali kek disapukan dengan cokolat mousse dan dihiasa dengan ceri dan cebisan cokolat. Banyak dijua di kedai kek. Kek ini merupakan koleksi kontinental kek yang cukup digemari.

Next Post - The Making of Rainbow Cake


THE MAKING OF RED VELVET CAKE


I've been late in updating my blog lately. Honestly I have plenty of pending recipes waiting to be upload. I just don't know where can I find the time to do so. Juggling between work and my passion - baking. Anyway this is one of the baking projects...which took me into the real technique of  baking. I've tried many recipe..some frighten me off with the used of coloring but this recipe is great just a minimum amount of coloring but the cake looks red. Some nescafe was added which enhance the aroma and flavour of the cake.


The Cake


To Assemble The Cake


Next Post - The Making of German Black Forest Cake


You Might Also Like These

Related Posts Plugin for WordPress, Blogger...