Pages

Showing posts with label Chocolate. Show all posts

Monday, November 20, 2017

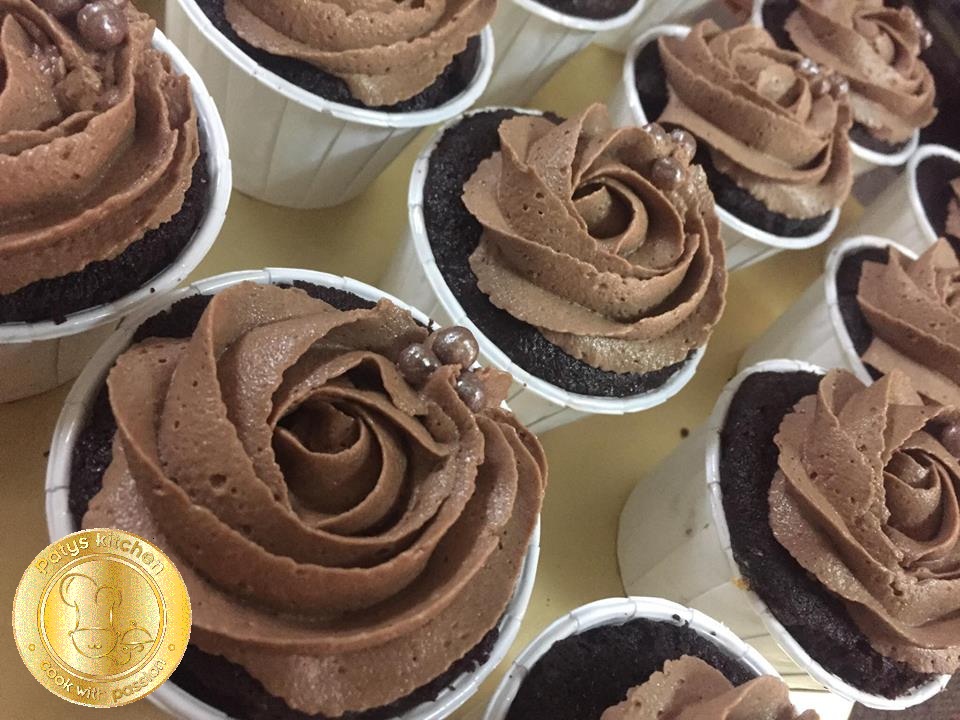
DEATH BY CHOCOLATE CUPCAKES


Resipi yang hebat, chocolate yang kaya dengan chocolate berintikan chocolate ganache dan dihias bersama chocolate buttercream. Tektur kek yang lembut dan moist. Bagi yang meminati chocolate cupcakes this is the one for you....seriously sedap.


Death By Chocolate Cupcake

Yield: - lebih kurang 12 cupcakes
Ini memang keeper, rich chocolate cake dengan ganache filling dan chocolate buttercream
  • 105 grams (3/4 cup) plain flour
  • 20 grams (1/4 cup) cocoa powder
  • 20 grams (1/4 cup) dutch processed cocoa powder
  • 1/2 teaspoon baking soda
  • 1/2 teaspoon baking powder
  • 1/2 cup (100 grams) caster sugar
  • 1/4 cup (45 grams) brown sugar
  • 2 large eggs
  • 115 grams (1/2 cup or 1 stick) unsalted butter
  • 1 teaspoon vanilla extract
  • 120 ml (1/2 cup) buttermilk


Chocolate ganache
  • 75 grams (1/2 cup) good quality dark chocolate, chopped
  • 120 ml (1/2 cup)  thickened or heavy cream

Chocolate buttercream

  • 115 grams (1/2 cup or 1 stick) unsalted butter, softened
  • 375 grams (3 cups) icing or powdered sugar
  • 20 grams (1/4 cup) dutch processed cocoa
  • 3 tablespoons milk
  • Chocolate sprinkles, to decorate


  1. Preheat the oven to 180C (360 F). Line a 12 hole muffin tin with patty cases.
  2. In a large mixing bowl, sift the flour, cocoa powders, baking soda, baking powder and then add the sugars.
  3. Pop the butter into the microwave for a short burst, 10 seconds or so at a time, until it is just melted. Give it a stir with a fork to eliminate any lumps. 
  4. In a separate mixing bowl, add the eggs, vanilla and butter and whisk together until smooth. Then add the wet mixture into the dry mixture, along with the buttermilk and gently fold until just combined.


Spoon the mixture into the prepared patty cases and pop into the oven. Bake for 18-20 minutes or until just cooked through. Set cakes out onto a wire rack and leave to cool completely.

Next make the chocolate ganache. Finely chop the dark chocolate and place into a bowl. In a small saucepan, warm the cream on a medium-low until it is slightly bubbling but before it is boiling. Pour the warm cream over the chocolate, cover with a plate and leave it for 3-4 minutes. Gently whisk the mixture until it becomes smooth. Refrigerate the chocolate ganache for 15 minutes or so until it thickens slightly. When it reaches your desired consistency, fill each cupcake with a teaspoon of ganache. You could use a syringe to do this or poke a hole in the cake with a chopstick and spoon it in using a teaspoon.

To make the chocolate frosting, add the butter to a large mixing bowl and beat with an electric mixer until creamy. Gently sift in the icing sugar, one cup at a time. Add a tablespoon or two of milk to help loosen up the mixture. Add the cocoa powder and continue to beat. Continue to add a tablespoon of milk if needed. The icing should be nice and creamy but thick enough to hold its shape. Pipe the icing onto the cupcakes using a piping bag and a large star tip. Sprinkle each cupcake with chocolate sprinkles.


RECIPE SOURCE:  PATYSKITCHEN. BLOGSPOT.COM
All images & content are copyright protected. Please do not use our images without prior permission. If you want to republish this recipe, please re-write the recipe in your own words, or simply link back to this post for the recipe.


Thank  You.-

Monday, February 27, 2017

SINFUL CHOCOLATE CAKE


This is another good chocolate cake recipe. Tektur kekny. cukup lembut, lembap dan terasa chocolatenya walaupun hanya mengunakan serbuk koko. Untuk lapisan dan frosting kek saya gunakan chocolate butter cream. Untuk mendapatkan kek yang tinggi saya buat 2 adunan dan bahagikan kepada 5 year. Obviously kek ini adalah keeper dan pasti menjadi favourite


Sinful Chocolate Cake

    Bahan A

    • 125 g butter
    • 1 cawan gula castor
    • 1 cawan gula perang
    • 1/2 sdt vanilla
    • 2 biji telur
    Bahan B

    • 2 cawan tepung superfine
    • 1/2 cawan serbuk koko
    • 1 1/2 sdt baking soda

    Bahagian C

    • 1 cawan air
    • 1/2 cawan yogurt
    Satukan kedua bahan ini

    Cara Menyediakannya

    Pukul mentega dengan kedua2 gula sehingga gebu
    Masukkan telur sebiji demi sebiji sehingga habis
    Masukkan bahan  B dan C berselang seli sehingga habis bermula dengan tepung dan berakhir dengan tepung
    Bahagi adunan kepada 3 dan bakar pada suhu 180 setiap satu
    Sejukkan sebelum dihias

    Chocolate Frosting


    • 200 g butter
    • 3/4 cawan serbuk koko
    • 1 1/2 cawan gula ising
    • 3/4 cawan dairy whipping cream (anchor)


    1. Pukul butter koko dan gula ising sehingga lembut
    2. Masukkan diary whipping krim sedikit demi sedikit sehingga habis
    3. Lapi dan hiaskan kek
    Notes


    RECIPE SOURCE:  PATYKITCHEN. BLOGSPOT.COM
    All images & content are copyright protected. Please do not use our images without prior permission. If you want to republish this recipe, please re-write the recipe in your own words, or simply link back to this post for the recipe. Thank  You.

    SACHER TORTE


    Sachertorte is a specific type of chocolate cake, or torte, invented by Austrian Franz Sacher in 1832 for Prince Wenzel von Metternich in Vienna, Austria. It is one of the most famous Viennese culinary specialties. 

    Itulah ceritanya, kek ini rendah aje dan cara membuatnya lebih kurang membuat brownies tapi putih telur diasingkan dan dipukul kental sebelum dicampur dengan bahan lain Tektur kek cukup lembut dan kek ini bertambah enak jika menggunakan chocolate yang tinggi kualitinya

    Resipi ini adalah adaptasi dari :-http://www.bbc.co.uk/food/recipes/sachertorte_59630


    Sacher Torte

      • 140g/5oz plain chocolate
      • 140g/5oz unsalted butter, softened
      • 115g/4oz caster sugar
      • ½ tsp vanilla extract
      • 5 free-range eggs, separated
      • 85g/3oz ground almonds
      • 55g/2oz plain flour, sieved


      For the topping and the icing

      • 6 tbsp apricot jam, sieved
      • 140g/5oz plain chocolate
      • 200ml/7fl oz double cream
      • 25g/1oz milk chocolate
      Method

      1. Preheat the oven to 180C/350F Grease a deep 23cm/9in round cake tin then line the base with greaseproof paper.
      2. Break the chocolate into pieces, melt gently in a bowl set over a pan of hot water, stirring occasionally, then cool slightly. Beat the butter in a bowl until really soft, then gradually beat in the sugar until the mixture is light and fluffy. Add the cooled chocolate and the vanilla extract and beat again. Add the egg yolks, then fold in the ground almonds and sieved flour. The mixture will be quite thick at this stage.
      3. In a separate bowl, whisk the egg whites until they are stiff but not dry. Add about one-third to the chocolate mixture and stir in vigorously. Gently fold in the remaining egg whites. Pour the mixture into the prepared tin and level the surface.
      4. Bake in the oven for about 45-50 minutes, or until well risen at the top and the cake springs back when lightly pressed with a finger. Leave to cool in the tin for a few minutes then turn out, peel off the paper and finish cooling on a wire rack.
      5. To make the topping, heat the apricot jam in a small pan and then brush evenly over the top and sides of the cold cake. Allow to set.
      6. Make the icing by breaking the plain chocolate into pieces. Heat the cream until piping hot, remove from the heat and add the chocolate. Stir until the chocolate has melted, then cool till a coating consistency. Then pour the icing on to the centre of the cake. Spread it gently over the top and down the sides, and leave to set.
      7. For the ‘icing’ writing, break the milk chocolate into pieces then melt gently in a bowl set over a pan of hot water. Spoon into a small paper icing bag or polythene bag and snip off the corner. Pipe ‘Sacher’ across the top and leave to set.
        Notes


        All images & content are copyright protected. Please do not use our images without prior permission. If you want to republish this recipe, please re-write the recipe in your own words, or simply link back to this post for the recipe. Thank  You.

        Thursday, January 19, 2017

        CHOCOLATE MALT BUTTERCREAM


        This is really nice frosting, frosting ini sesuai untuk chocolate cake jika ingin lari dari normal ganache. Campuran koko, milo dan nescafe memang awesome. Saya buat untuk anak teruna saya yang menyambut ulang tahun ke 25 perghhh rasanya macam milkshake....memang awesome


        Chocolate Malt Buttercream


          • 170 g butter
          • 1/2 cawan coco powder
          • 1 cawan gula ising
          • 1 sdt vanilla
          • 2 sdb susu segar
          • 1/2 cawan whipped cream
          • 1/3 cawan milo
          • 1 sdt nescafe
          Cara Menyediakannya
          1. Pukul mentega serbuk koko, gula ising, vanilla dan nescafe sehingga kembang
          2. Masukkan milo pukul lagi
          3. Akhir sekali masukkan whipped cream dan susu
          4. Pukul sehingga rata dan sebati
          Notes


          RECIPE SOURCE:  Patyskitchen.blogspot.com
          All images & content are copyright protected. Please do not use our images without prior permission. If you wa
          nt to republish this recipe, please re-write the recipe in your own words, or simply link back to this post for the recipe. Thank  You.

          Tuesday, November 29, 2016

          ALMOND FUDGY BROWNIES


          Tiada perkataan jemu when come to brownies....ha...ha bukan aje sedap tapi cepat dan mudah menyediakannya. Dengan sedikit creativity boleh mempelbagaikanya, kekacang, nutella, peanut butter dan apa aje yang diminati boleh dijadikkan bahan untuk menghasilkanya. 

          Ini adalah brownies ringkas yang dinaikkan sedikit tarafnya dengan meletak taburan badan dan coretan nutella....perghhh memang hebat dengan secangkir kopi panas


          Almond Fudgy Brownies

          • 300 gm Dark Chocolate Bar Beryls (Beryls antara coklat yang paling sedap untuk buat kek coklat dan brownies).
          • 100 gm Anchor Salted Butter
          • 3 biji telur gred A
          • 100 gm gula
          • 1 sudu teh esen vanila
          • 125gm tepung gandum
          • 150 gm Milk Chocolate Coins Beryls
          • 1/2 cawan hirisan badam


          Cara-cara membuatnya;


          1. Potong coklat bar dan butter kecil-kecil dan cairkan secara double boil.
          2. Dah cair, angkat mangkuk dari atas dapur.
          3. Masukkan gula dan kacau sebati. Gunakan hand whisk sahaja untuk kacau. tak perlu mixer.
          4. Kemudian, masukkan telur satu per satu dan kacau sehingga sebati.
          5. Masukkan esen vanila.
          6. Masukkan esen vanila.
          7. Seterusnya masukkan tepung sedikit demi sedikit.
          8. Kacau adunan sehingga sebati dan tepung tidak berketul.
          9. Gunakan hand whisk untuk mengetahui tekstur adunan.
          10. Masukkan coklat coins. Gaul sekejap saja secara kaup balik. jangan sampai coklat cair. Tinggalkan sedikit coklat coins untuk hiasan.
          11. Masukkan adunan dalam tray. Lapik tray terlebih dahulu dengan kertas minyak (baking paper) supaya brownies tidak melekat apabila diangkat.
          12. Susun lebihan coklat coins dan hirisan badam ke atas adunan kek. Bakar selama 30-35 minit dengan suhu 180 darjah celcius.
          13. Siap untuk dihidangkan. Lebih enak jika dinikmati bersama aiskrim vanila

            Notes


            RECIPE SOURCE:  Patyskitchen.blogspot.com
            All images & content are copyright protected. Please do not use our images without prior permission. If you want to republish this recipe, please re-write the recipe in your own words, or simply link back to this post for the recipe. Thank  You.

            Saturday, October 01, 2016

            DOUBLE CHOCOLATE PISTACCIO BISCOTTI


            Saya suka biscotti cara Anna Olson ni, mudah dan ringkas tak perlu dibentukkan seperti log dan didinginkan, adunan terus diletak diatas dulang pembakar dan terus dibakar, sejukkan potong dan bakar semula perghhh memang kena dengan cara saya yang tak suke renyah

            Biscotti ini pula memang ranggup, chocolatay dan yang paling best lebih lama simpan dalam container maka ia semakin ranggup. Obviously a keeper

            Double Chocolate Biscotti

            • 4 large eggs, at room temperature
            • 1 large egg yolk
            • 1 ¼ cups granulated sugar
            • 2 tsp vanilla extract
            • 2 cups all-purpose flour
            • ½ cup cocoa powder (Dutch process or regular)
            • 1 ½ tsp baking soda
            • ½ tsp salt
            • 1 ¼ cups shelled unsalted pistachios
            • 1 cup dark chocolate chunks, chopped or dark chocolate chips


            DIRECTIONS
            1. Preheat the oven to 350 °F (180 °C) and line a baking tray with parchment paper.

            2. With electric beaters or a stand mixer fitted with the whip attachment, whip the eggs, yolk, sugar and vanilla on high speed until it holds a ribbon when the beaters are lifted, about 3 minutes.

            3. Sift the flour, cocoa powder, baking soda and salt and fold this into the whipped eggs until fully incorporated (the mixture will deflate a little, and seem like a cake batter in consistency). Stir in the pistachios and chocolate chunks (or chips) and spoon this onto the prepared baking tray and spread into the rough shape of a single log – the batter will be soft, so don’t worry if the shape isn’t too precise. Bake this for about 35 minutes, until a tester inserted into the centre of the cantucci log comes out clean – because of the melted chocolate chunks within, you may have to test in a few places. Allow this to cool for about 20 minutes and reduce the oven temperature to 300 °F (150 °C).

            4. Remove the cantucci log to a cutting board and use a serrated knife to slice across the width into cookies that are ½-inch thick. Arrange these on the lined baking trays (you’ll need 2 trays for this step) and bake for 12 minutes. Remove the trays from the oven and flip the cantucci over, returning to the oven to bake another 12 minutes. Cool the cantucci on the tray. If you find that after cooling, the cantucci aren’t crunchy all the way through, you can return them to the oven to bake a few more minutes.


            Notes


            RECIPE SOURCE:  Patyskitchen.blogspot.com
            All images & content are copyright protected. Please do not use our images without prior permission. If you want to republish this recipe, please re-write the recipe in your own words, or simply link back to this post for the recipe. Thank  You.


            Thursday, September 29, 2016

            CHOCOLATE PEPPERMINT CUPCAKES


            Chocolate dan peppermint adalah atu kombinasi yang segar dan sedap. Cupcake ini adalah chocolate cupcakes biasa yang dihiasi dengan Peppermint Buttercream.  Apa yang menarik tentang resipi chocolate cupcakes ini adalah ia merupakan chocolate moist cake versi cupcake. 

            Nyata cupcakes ini cukup moist dan kehebatan peppermint buttercream ini membuatkan cupcakes ini tidak jemu dinikmati.


            Chocolate Buttercream Cupcakes

            Untuk cupcake


            • 1 cawan tepung
            • 1 cawan gula perang
            • 1/2 cawan serbuk koko
            • 1 biji telur
            • 1 sdt bicabonate soda
            • 1/4 cawan minyak masak
            • 1/2 cawan susu
            • 1/2 cawan air panas
            • 1 sdt vanilla
            1. Satukan semua bahan kering dan ketepikan
            2. Dalam bekas lain kacau semua bahan basah kecuali air panas
            3. Campurkan bahan basah dan bahan kering dan gaul rata
            4. Akhir sekali masukkan air panas dan vanilla dan gaul rata sehingga sebati
            5. Masukkan dalam acuan cupcake dan bakar pada suhu 180 C selama 15 - 20 minit
            6. Sejukkan dan hiaskan dengan buttercream peppermint
            Untuk resipi Mint Buttercream klik di sini :-


              Notes

              RECIPE SOURCE:  Patyskitchen.blogspot.com
              All images & content are copyright protected. Please do not use our images without prior permission. If you want to republish this recipe, please re-write the recipe in your own words, or simply link back to this post for the recipe. Thank  You.


              Monday, September 26, 2016

              CHOCOLATE PEAR CAKE


              Kek ini cukup unik, buah pear di poached bersama air gula dan dibenamkan dalam kek batter....ha..ha bila sudah masak kita seolah-olah menikmati dua hidangan a chocolatae cake dan pear poach Kek dan resipi adalah inspirasi dari Donna Hay Chef tersohor dari Aussie 

              Saya memang suka kek ini dan paling best saya menikmatinya dengan vanilla ice cream...perghhh nikmat tak terkata


              Chocolate Pear Cake

              • 4 small pears
              • 500ml water
              • 170g granulated or caster sugar
              • 1 teaspoon ground cinnamon
              • 1 teaspoon lemon juice


              1. Peel the pears, slice the bottoms off so they are level, and cut the seeds out from inside the pears.
              2. Put the water, 170g of granulated or caster sugar, 1 teaspoon of caster sugar, and 1 teaspoon of lemon juice. Heat the water, stirring occasionally, until the sugar has dissolved, and the water is gently simmering. Put the pears into the water, and gently poach for about 10 minutes, until the pears have softened slightly. Remove from the water, and drain onto kitchen paper to remove excess water.


              For the cake:

              • 185g butter (soft)
              • 1 ½ cups brown sugar
              • 3 eggs
              • 2 cups self-raising flour
              • 1/3 cup cocoa powder


              Beat the sugar and butter together until light and fluffy, add eggs one at a time and mix well. Sift the flour and cocoa into the bowl and mix well until everything is combined.

              Spoon the mixture over the pears, smooth the top and bake for 50-60 minutes or until cooked through.

              Cool for about 10 minutes and then invert onto a serving plate.

               Notes


              RECIPE SOURCE:  Patyskitchen.blogspot.com
              All images & content are copyright protected. Please do not use our images without prior permission. If you want to republish this recipe, please re-write the recipe in your own words, or simply link back to this post for the recipe. Thank  You.


              You Might Also Like These

              Related Posts Plugin for WordPress, Blogger...