Pages

Wednesday, October 30, 2013

HOW TO MAKE CHOCOLATE MODELLING


Semasa program ICCA baru-baru pengasas ICCA Rosalind Chan ada menunjukkan  "figurine" yang dibuatnya. Cukup menarik.anak patung dibawah dibuat dari chocolate. Trend sekarang orang lebih gemar menggunakan chocolate modelling dari gum paste. Chocolate Modelling mudah dibentuk dan mudah diubah suai. Saya melihat cara Rosalind menyiapkan kerjanya cukup menarik. Katanya Chocolate Modelling ini lebih sedap berbanding dengan gum paste. Oleh kerana tertarik dengan Chocolate Modelling ni saya balik membuat research dan di sini saya paparkan resipi membuat chocolate modelling. Belum cuba membuatnya tetapi insyallah akan mencuba bila saya memberanikan diri membuat figurine.

Chocolate Modelling Recipe

2 lbs. (1 kg) white chocolate (in any form, block, chunks or chips)
1 cup (236 ml) light (clear) Karo corn syrup

Directions
Melt chocolate in a microwave-safe bowl in 30-second intervals on High (100%), stirring between heating. Do not overheat. The bowl should be almost cool to the touch. Overheating will quickly cause the chocolate to burn.

Heat corn syrup in a separate microwave-safe bowl on High (100%) for 45 seconds.

Pour syrup into melted chocolate and stir with a rubber spatula until completely blended, about 30 generous folds of the spatula. Make sure the spatula and bowl are scraped clean of white chocolate. If any white chocolate has not made contact with corn syrup, you will have lumps in your finished modeling chocolate. Watch for white chocolate streaks while you stir. Mix until the streaks are gone.

Do not over-mix. If you over-mix, you will notice your chocolate becoming crumbly and falling apart. The over-mixing is pulling out too much cocoa butter (fat) from the chocolate. The crumbly chocolate will settle at the bottom of the bowl and the clear liquid fat will rise to the top. You will not be able to blend the fat back into the chocolate once this happens.

Line a quarter-sheet (9 x 13 in or 23 x 33 cm) cake pan with a large sheet of plastic wrap, making sure there is plenty of overhang. Pour chocolate mixture into pan and wrap the over-hanging plastic wrap around the chocolate. Pull the plastic wrap straight and tight over chocolate. If the plastic gathers and pokes into the chocolate, you will have trouble pulling it out of the modeling chocolate after it hardens. Cover tightly with plastic wrap and set aside at room temperature overnight.

The next day, cut the block of modeling chocolate into knead-able sections. The block will be greasy. It needs to be kneaded. Dust a little cornstarch on the table to knead if chocolate is sticky. If the block is too hard for you to knead, heat in microwave 5 seconds at a time until you can begin to easily press your fingers into the block with less force. You will notice the block changing into a silky and pliable clay-like ball. It will be a light ivory color after it is kneaded. This is now Modeling Chocolate.
Cover with plastic wrap (Press-n-Seal is best) and drop in a resealable plastic bag for storage.

Store at room temperature for 3-4 months before the oils begin to dry out, or in the freezer for up to 2 years.

To color: Knead in gel paste or liquid paste color of any kind. The water-based icing colors will be perfect for the job. Start with a small amount, and add a little bit at a time until you get the color you want.

To make white, you must use white (titanium dioxide) powder or liquid color made for chocolate. Add it to the chocolate a little bit at a time until you get the color you want. The water-based white colors are too liquid for this job.

You can use pre-colored candy melts to make modeling chocolate, which is a helpful tip when you need several pounds of one color. You can also pre-color your melted white chocolate before adding your corn syrup.


Tip: If you're getting chunks of white chocolate in your finished product, then you did not blend the corn syrup with the melted white chocolate completely. You can try to re-melt in the microwave and mix again by getting it to a very soft and pliable temperature. But do not overheat or the fat will separate from the chocolate.

If you're getting grit in your finished product, then you have over-mixed and pulled too much fat out of the white chocolate. The modeling chocolate will be a crumbly mess as you knead. There is no way to restore it to a smooth and workable clay at this point.


The same recipe, minus 1/4 cup (60 ml) corn syrup, works for milk/dark chocolate and does not have as many issues as white chocolate. However, you're stuck with brown and have no color options other than black.


Video by Lauren Kitchen


Tuesday, October 29, 2013

ICCA - PRE ANNIVESARY CAKE DEMONSTATION

Non-stop demo, free flow of teh tarik and food. Happy and fulfilled Wilton-ators and their bags of discounted Wilton tools. Really happening at ICCA Pre anniversary Sales and Demonstration..and am glad to be there...tremendous exposure and experience...that make me want to learn more from the cake sifu..and here's some of the techniqueS and demonstration presented by the expert...just LOVE it

Folk Art Paint by Zahir - am planning to join the class soon

Royal Icing Lace Embroidery - by Yoke Moy

Patch work cutter by Nuraini Tan

Chocolate Modelling by founder Rosalind  Chan- very interesting with her magic finger in figurine

Halloween Cupcake by Angeline Stanley

Another Cake Painting

Royal Icing Rose by Sharifah


Daffodils by Faridah


The flowers were from rice paper - awesome !!!!
Not only being exposed with all sort of techniques we also enjoying ourselves good with Teh tarik demonstations..good food, desserts..ha..ha..non stop..makan....makan..makan...and it was fabulous...meeting new friends..got to meet some celebrities chef like Amy Beh and Juliza...and overall worth attending and I enjoyed myself good..

Celebrity Chef - Julia Adlizan

Prominent Cook book writer cum chef - Amy Beh

The Dancing Teh Tarik Chef..


Monday, October 28, 2013

FRANGIPANI WITH STRAWBERRY FILLING


Frangipane (or frangipani) is an almond-flavoured sweet pastry cream used when preparing various desserts, sweets, cakes and pancakes. It is made with milk, sugar, flour, eggs and butter, mixed with either crushed macaroons or with ground almonds.


Kek yang istimewa dan sesuai untuk sebarang majlis. Diperbuat daripada serbuk badam dan mempunyai lapisan crust..seperti crust tart. Untuk topping atau filling atas boleh letak apa jua....jem..ataupun buah apricot tin. Kalau yang selalu buat macaron...jangan buang serbuk badam yang kasar tu..simpan dan gunakan pakai resipi ini untuk membuat kek yang sedap...


Frangipani With Strawberry Filling
 
Pastry
100 g butter, softened 

50 g icing sugar
1 large egg, whisked
Grated zest of two lemons
1/8 tsp salt
200 g all-purpose flour
Flour for dusting

Filling
120 g  unsalted butter, softened
80 g sugar
2 large eggs
Juice of two lemons
60 g  all-purpose flour
50 g cake crumbs
20 g gound almond
1/2 tsp cinnamon

1/8 tsp salt
Instructions: 
Step 1: Preheat oven to 350ºF.
Step 2: Line bottom and sides of pan with 2 sheets of parchment paper, 1 running lengthwise and the other widthwise.
Step 3: To make the pastry, cream together the butter and sugar in a large bowl. Add egg, lemon zest (reserve lemons to use juice in filling later on) and salt, beating until smooth. Gradually stir in flour to form soft dough.
Step 4: Scatter dough in clumps evenly over bottom of prepared pan. With well-floured hands, spread and pat dough to cover bottom of pan, reflouring hands as necessary to prevent sticking. Set aside while making filling.
Step 5: To make the filling, cream together butter and sugar in a bowl until fluffy. Add eggs 1 at a time, beating well after each addition. Blend in lemon juice, flour, ground almond, cinnamon and salt until just combined.
Step 6: Assemble cake: using a rubber spatula, spread filling mixture evenly over pastry in pan.
Step 7: Spread strawbery jam o any flavour on top filling
Step 8: Bake 40-45 minutes, until the cake's edges are golden and the centre of the cake is firm when touched. Let cool completely on a rack before cutting. Lightly dust with icing sugar, if desired.
Step 9: Serve with Maple Crème Fraîche, whipped cream or ice cream. It's best to serve this cake on the day it's made.

Friday, October 25, 2013

BROWNIES CHEESECAKE - AFFORDABLE BUDGET


Cheesecake memang merupakan kek kegemaran umum..tapi masyallah kalau hendak membuatnya memanglah tinggi belanja..hendak beli dikedai lagi mahal..paling murah satu slice 7 ringgit. Tetapi alhamdulillah resipi ini tidaklah membebankan...kek cheese biasa yang kita buat selalunya memperuntukan paling kurang 4 ketul cream cheese...ha..ha..kalau satu ketul sudah 11 ringgit bayangkan kita kena habiskan untuk cheese aje dah hampir 50 ringgit belum termasuk bahan lain..so memang parah membuatnya.

Resipi ini hanya menggunakan 2 ketul cheese dan rasanya kalau buat untuk makan keluarga memang sesuai..ngam-ngam tanpa pembazian..saiz loyang saya gunakan yang agak kecil sedikit 8"..tektur kek sama cantik dan lincin..rasanya pun hebat. Lapisan bawah saya gunakan resipi bownies..kalau tidak suka bolehlah gunakan resipi asal..sama ada kek span mahupun lapisan biskut. Apa pun saya happy dengan hasil kek ini.


Brownies Cheesecake
Prep time
Cook time
1;30 
Total time

Untuk Brownies
113 g mentega
113 g cokolat masakan
200 g gula
2 biji telur
60 ml susu
120 g tepung

  1. Cairkan mentega dan cokolat..alihkan dai api dan masukkan gula. Kacau supaya lincin. Sejukkan selama 15 minit.
  2. Masukkan telur dan pukul pada speed yang rendah supaya telu sekata dan tidak masak.
  3. Masukkan tepung dan susu gaul rata sehingga sebati dan lincin
  4. Tuangkan dalam acuan pembakar dan baka selama 25 minit pada suhu 350 dan sejukkan. Saya gunakan loyang cheesecake 8"
  5. Keluarkan dan sejukkan sementara menyediakan bahan cheese
Untuk Bahan Cheesenya

504 g cream cheese
140 g gula
3 biji telur
120 ml yogurt - saya guna krim masam aje
1 sdt vanilla

  1. Satukan semua bahan dan pukul sehingga sebati. Kecilan api oven kepada 325  dan tuangkan adunan cheese ke atas adunan bownies tadi dan bakar selama 55-60. atau sehingga bahagian tengahnya dan mengeras.
  2. Sejukkan sebelum dikeluarkan dari acuan..seeloknya 4 jam atau semalaman dalam fridge.
  3. Siap dihidang bersama cream atau cokolat
Ingredients
1/2 cup (113 grams) butter room temperature
4 oz        (113 grams) (Baker's or Ghirardelli) Bittersweet Chocolate Broken Into Pieces
1 cup (200 grams) Sugar
2 Eggs
1/4 cup (60 ml) Milk
1 cup (120 grams) All-purpose Flour
Cheesecake Layer
2 1/4 cups            ( 504 grams) (Philadelphia) Cream Cheese room temperature
2/3 cup (140 grams) Sugar
3 Eggs
1 tsp      Vanilla Extract
1/2 cup (120 ml) (Stonyfield) Greek Yogurt
Instructions

  1. Preheat oven to 350. Lightly grease and flour a 9 inch springform pan or line with parchment paper. Set aside.
  2. Melt butter and chocolate in pan over low heat, stirring frequently, until smooth. Remove form heat and beat in sugar. Leave to cool 5 minutes stir constantly.
  3. Add eggs and milk to the chocolate mixture, beating on medium speed for mixers or as fast as you can if done by hand to prevent the eggs from cooking.
  4. Stir in the flour, mixing just until blended. Spoon into the prepared pan, spreading evenly. Bake for 25 minutes.
  5. Remove from oven while preparing the cheesecake layer.
  6. Reduce oven temperature to 325.
  7. In a mixing bow beat together all the ingredient, making sure there are no cheese lumps then pour over brownie base.
  8. Bake for 50 to 55 minutes or until center is almost set.
  9. Run a knife around edge of cake to loosen from pan.
  10. Let cool before removing form pan.
  11. Chill in refrigerator for 4 hours or overnight before cutting into slices.

Thursday, October 24, 2013

MAKLOUBEH MIDDLE EASTERN UPSIDE DOWN CHICKEN RICE


Lagi satu resipi Nasi Aab yang cukup mudah menyediakanya. Nasi Makloubeh Ayam. Makloubeh ialah terbalik..nasi ini bila sudah masak diterbalikkan..jadi ayam dan bahan-bahan lain berada di atas. Cukup mudah dan sedap. Oleh kerana kehabisan beras basmathi saya menggunakan beras biasa aje....sedap juga...

Bahannya

4 cawan beras basmathi
4 cawan stok ayam.
1/2 cawan minyak sapi.
1 biji teung dihiis nipis dan digoreng
2 biji kentang dihiis nipis dan digoreng
1/2 bunga kobis dikelopakkan dan digoreng
1 ekor ayam dipotong 12

Bahan untuk di perap ayam

1 sdb jintan putih
1/2 sdb sebuk ketumba
1/2 sdb gaam masala
garam secukup rasa

Lumurkan semua bahan ke atas ayam

Cara membuatnya

Panaskan minyak dan tumiskan ayam seketika lebih kuang dalam 10 minit. Lapiskan atas ayam dengan terung. bunga kobis,  dan kentang. Letakkan beras yang dibasuh bersih dan masukkan air stock yang dimasukkan garam. Masak sehingga masak. Setelah masak..terbalikkan atas pinggan dan hidang.  Boleh juga ditaburkan dengan gajus atau badam goreng. Makan begitu aje dan kalau suka boleh buat sambal tomato cili hijau atau sedikit dalca.

SELAMAT MENCUBA


Sunday, October 20, 2013

DEVIL FOOD CHOCOLATE CAKE


Devil Food Cake...seram dengar namanya..tapi jangan tanya saya macam mana kek ni dapat namanya..samada ianya berantu....yang menyeramkan atau berantu yang menyebabkan kita berulang-ulang kali mahukannya...ha..ha..rasanya definasi yang kedua lagi tepat dan sedap didengari. Ini pertama kali saya mencubanya resipi ni tapi tak ingat pula dari mana asalnya..main salin aje lupa asal-usul penulisnya. Macam cokolat kek yang lain kek ni lembap dan lembut. Resipi asal kek ini dibuat 4 lapis..tapi saya buat 3 lapis aje ..sebab loyang kek umah cuma ada tiga. Menariknya resipi ini ia menggunakan mayo..ha..ha..pertama kali mendengarnya...dan untuk frostingnya digunakan ganache tapi saya olahkan dengan menggunakan butter cream sebab hendak cepat malas nak bermalamkan ganache.


4.7 from 207 reviews
DEVIL FOOD CHOCOLATE CAKE
Prep time
Cook time
Total time
Chocolate Cake with decadent  Buttercream Chocolate Frosting that will quickly become your favorite!

This four-layer Southern classic is made with cocoa powder, not chocolate, with a generous spoonful of mayonnaise in the batter to keep the cake moist and rich. A simple, luscious ganache of semisweet chcoolate, cream, and butter does double duty as filling and frosting.

I used chocolate buttercream for this cake...equally good!!!
Ingredients
For the Cake
  • 6 oz. (3/4 cup) unsalted butter, softened; more for the pans
  • 8 oz. (1-3/4 cups) all-purpose flour; more for the pans
  • 2 cups packed dark brown sugar
  • 2 tsp. pure vanilla extract
  • 3 large eggs, at room temperature
  • 2-1/4 oz. (3/4 cup) unsweetened Dutch-processed cocoa powder
  • 1-1/4 tsp. baking soda
  • 1 tsp. baking powder
  • 1 tsp. kosher salt
  • 1-1/2 cups buttermilk, preferably low fat, at room temperature
  • 1/4 cup mayonnaise
Make the Ganache
Put the chopped chocolate in a medium bowl. Bring the cream to a boil in a 2-quart saucepan over medium-high heat. Pour the hot cream directly over the chocolate and let it sit without stirring for 5 minutes. Using a whisk, stir in the center of the mixture in a small, tight circular motion until fully combined. Add the butter and stir until it is fully incorporated. Put a piece of plastic wrap directly onto the surface of the ganache and set aside at room temperature for at least 8 hours or overnight.
Make the Cake
Position a rack in the center of the oven and heat the oven to 350°F. Butter two 8x2-inch round cake pans and line each with a parchment round. Butter the parchment, dust with flour, and tap out any excess.
In a stand mixer fitted with the paddle attachment, beat the butter, brown sugar, and vanilla on medium-high speed until lighter in color and slightly increased in volume, 3 to 5 minutes. Lower the speed to medium and add the eggs, one at a time, mixing until each is fully incorporated before adding the next

Sift the flour, cocoa powder, baking soda, and baking powder onto a piece of parchment. Add the salt to the dry ingredients after sifting.Using the parchment as a chute, add one-quarter of the dry ingredients to the batter and mix on low speed until incorporated. Add about 1/2 cup of the buttermilk and mix on low speed until incorporated. Continue to alternate dry ingredients and buttermilk, mixing until incorporated after each addition and stopping to scrape the bowl and beater as necessary. Using a whisk, fold the mayonnaise into the batter.

Divide the batter evenly between the prepared pans and bake until a toothpick inserted in the center of the cakes comes out clean and the sides of the cake have begun to pull away from the pan slightly, 40 to 45 minutes. Remove the pans from the oven and cool on a rack for 15 minutes. Invert the cakes onto the rack and remove the pans and parchment. Cool the cakes completely. 
Assemble the Cake
With a serrated knife, cut each cake in half horizontally. Put one of the base layers on a cake plate and tuck strips of waxed paper under the cake to keep the plate clean while icing the cake.
Top the cake with about 1/3 cup of the ganache, spreading it evenly over the top. Add another cake layer, top with ganache, and repeat until the last layer is in place.
Spread a thin layer of ganache over the top and sides of the cake and refrigerate for 15 minutes to seal in any crumbs. Spread the remaining ganache over the top and sides. Remove the waxed paper.
Make Ahead Tips
The cake layers may be baked 1 day ahead; wrap well and store at room temperature. The filled and frosted cake may be refrigerated, covered, for up to 2 days. 

Wednesday, October 16, 2013

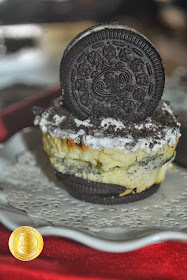
MINI OREO CHEESECAKE - MATHA STEWART RECIPE


Kek ni bukan hendak cakap sekali makan memang hendak lagi, biasanya kita buat pakai acuan cheesecake tapi yang ini akak gunakan acuan mufffin..senang untuk dijamu tak payah hendak potong. Biskut Oreo diletakkan dibawah dan bila ditonggengkan muffin ni nampak jelas oreonya. Mudah menyediakanya..saya letakkan pocess step by step. Untuk hiasannya boleh dibuat dua cara sama ada dicairkan chocolate dituangkan di atasnya atau pun di isingkan dengan cream dan taburkan sebuk oreo mahupun diletakkan oreo, Sejukkan semalaman kalau inginkan hasil yang hebat.


MINI OREO CHEESECAKE

Prep time
Cook time
Total time
Bahan-bahanya

2 bungkus ccokies oreo
450 g cream cheese
1/2 cawan gula halus
2 biji telur
1/2 cawan sour cream
esen vanilla

1. Panaskan oven pada 135 C


2. Masukkan Oreo pada cawan muffin yang dimasukkan paper cup


3. Keluakan cheese


4. Pukul cheese sehingga lincin dan pelahan-lahan masukkan gula


5. Masukan telu sebiji demi  sebiji dan pukul sehingga sebati. Kemudian masukkan esen vanila


6 Kaup rata

7. Sudukan ke dalam acuan muffin yang disediakan oreo tadi..akak guna scoop ice cream supaya sama


8. Bakar pada suhu 135 C selama 20 min sejukkan semalaman.


22 Oreos (16 whole, 6 chopped coarsely)
450g Cream Cheese, room temperature
1/2 C Sugar
1/2 t Vanilla Extract
2 Eggs, room temperature, lightly beaten
1/2 C Sour Cream
Pinch of salt
1 C Cream
16 Mini Oreos

Preheat oven to 135 degrees C and line a muffin tin with cupcake cases.
Place one Oreo in each cupcake case.
Beat cream cheese until smooth and gradually add sugar.
Add vanilla and mix until combined.
Gradually add eggs to mixture and beat until combined, making sure to scrape down the sides of the bowl as you go.
Add sour cream and salt and mix until combined
Add chopped Oreoas and stir in by hand.
Spoon mixture into cupcake cases until almost full.
Bake for approximately 22 minutes or until filling is set.
Let cool in tins then refrigerate for at least four hours (it's best left overnight).
Whip cream until it holds it shape and pipe small swirls in the middle of each cheesecake.

Top with a mini Oreo and enjoy!